Add live chat to WordPress, answered from Slack, Teams or Discord
The Chatlio plugin puts a chat widget on every page of your WordPress site, and your team answers visitors from Slack, Microsoft Teams or Discord. You install the plugin, paste one widget ID, and save. There is no code to edit.
Related pages: setup, widget API and Content Security Policy.
Before you start
You need:
- A Chatlio account. Every plan includes a 30-day free trial, and the plugin needs an active trial or plan to work. Sign up or see pricing.
- A Chatlio widget connected to Slack, Microsoft Teams or Discord. Signup walks you through it. See Choose where your team answers.
- WordPress 5.9 or later, running on PHP 8.3 or later. WordPress won’t activate the plugin on an older PHP version. If your host runs an older PHP, ask the host to upgrade it, or add the embed code without the plugin.
- An administrator account on your WordPress site. Only users who can manage site options see the plugin’s settings page.
Install the plugin
The plugin is listed on WordPress.org as Chatlio Live Chat for Slack. It works the same way for Teams and Discord widgets.
- In your WordPress admin, go to Plugins and select Add New Plugin. Older WordPress versions call it Add New.
- Search for
Chatlio. - On Chatlio Live Chat for Slack, select Install Now, then Activate.
To install from a file instead, download the zip from the plugin’s WordPress.org page and upload it under Plugins > Add New Plugin > Upload Plugin.
Connect it to your widget
The plugin has one setting, your widget ID.
- Open the Chatlio dashboard and select the widget you want on this site.
- Open the Widget Install tab. If it says Finish connecting this widget, select Continue setup and finish connecting Slack, Teams or Discord first.
- Under Choose your project type, select Wordpress.
- Copy the value under Chatlio widget ID.
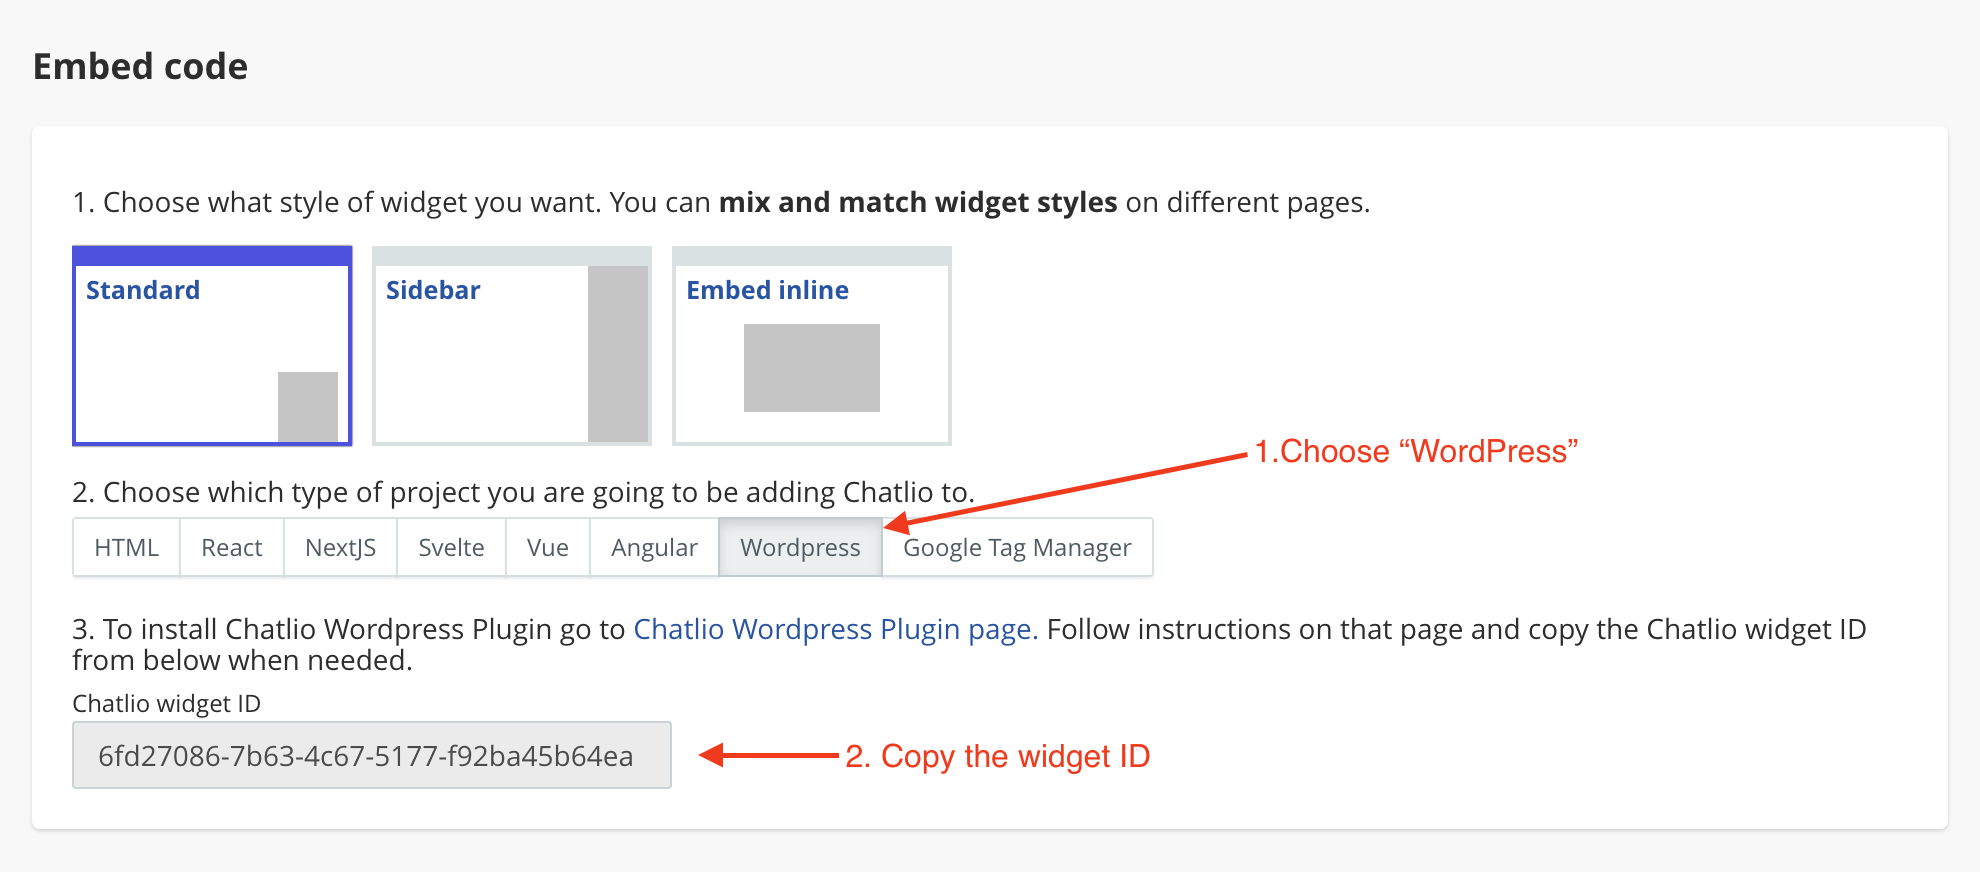
- In WordPress, go to Tools > Chatlio.
- Paste the ID into Widget ID and select Save Changes.
- Open your site in a private browser window. The chat button appears in a bottom corner of the page.
If you use a caching plugin or a host-level cache, clear it after you save. Otherwise visitors keep getting cached pages without the widget. See Caching and performance plugins.
The plugin always shows the Standard style, the chat button in the corner. The Sidebar and Embed inline styles on the Widget Install tab need the HTML embed code instead. See Add the embed code without the plugin.
Choose where your team answers
Your visitors see the same widget whichever platform you choose, and they don’t need an account on any of them. You pick the platform when you set up the widget in Chatlio.
- Slack. Each new conversation appears in the Slack channel you chose during setup. An operator picks it up and replies in a dedicated Slack channel for that visitor. Start with the quick start guide, or read how it works on live chat for Slack.
- Microsoft Teams. Each visitor gets a thread in the Teams channel you link. A Teams administrator has to add the Chatlio app to your organization first. Follow Chatlio for Microsoft Teams, or read the overview on live chat for Teams.
- Discord. Each visitor gets a thread in the Discord channel you pick, and anyone who can see that channel can reply. Follow Chatlio for Discord, or read the overview on live chat for Discord.
The WordPress side is the same for all three. Only the widget ID changes.
Customize the widget
You change how the widget looks and behaves in the Chatlio dashboard, not in WordPress. The widget loads its settings from Chatlio each time a page loads, so changes show up on your site without touching WordPress or clearing your cache.
- Appearance covers colors, text, the closed style and CSS.
- Behavior covers what happens when you’re offline, transcripts and pre-chat questions.
- Triggers send an automatic message to visitors on chosen pages.
- Use your own button to open the chat from a link or button in your theme.
Triggers, saved replies, pre-chat questions and removing the Chatlio link need the Team plan or higher. The Mini plan doesn’t include them. See pricing.
Show the widget on some pages only
The plugin itself has no page rules. It adds the widget to every front-end page your theme renders. To limit where the widget appears, use one of these options.
Hide it on chosen pages from the dashboard
- Open the Chatlio dashboard and select your widget.
- On the Behavior tab, find Page targeting and Hide the Chatlio widget on selected pages.
- Add one pattern per line. The widget stays hidden on any page whose full URL matches a pattern.
Each line is a JavaScript regular expression, a text pattern, matched against the whole address, such as https://example.com/blog/post/. A plain path works for simple cases. This line hides the widget on every blog page:
example.com/blog/
To show the widget only on a few pages, hide it everywhere else. This line keeps the widget only on your pricing and contact pages:
^(?!.*example\.com/(pricing|contact)/)
Don’t use spaces or commas inside a pattern. Chatlio treats both as separators between patterns. More examples are in hide the widget on selected pages.
Hide it by country
On the same Behavior tab, Only show widget in these countries and Hide widget in these countries take country codes. See show the widget in certain countries.
Hide it with WordPress code
If you’d rather use WordPress conditional tags, such as a page slug or a logged-in check, you can stop the plugin from adding the widget on those requests. Add this to your child theme’s functions.php or a code snippets plugin, and change the condition to suit your site:
add_action( 'wp', function () {
    if ( ! class_exists( 'Chatlio' ) ) {
        return;
    }
    // Change this condition to choose where the widget is hidden.
    if ( is_page( array( 'checkout', 'privacy-policy' ) ) ) {
        remove_action( 'wp_head', array( Chatlio::$instance, 'wp_head' ) );
        remove_action( 'wp_footer', array( Chatlio::$instance, 'wp_footer' ) );
    }
} );
This removes both parts the plugin adds, the script and the widget element, so nothing from Chatlio loads on those pages.
Pass logged-in user details
If visitors log in to your WordPress site, you can tell Chatlio who they are. Your team then sees the visitor’s name and email with their first message. In Slack, Chatlio also uses the name for the visitor’s channel.
The plugin doesn’t send user details on its own. Add this snippet to your child theme’s functions.php or a code snippets plugin:
add_action( 'wp_footer', function () {
    if ( ! is_user_logged_in() ) {
        return;
    }
    $user   = wp_get_current_user();
    $traits = array(
        'name'  => $user->display_name,
        'email' => $user->user_email,
    );
    ?>
    <script>
    document.addEventListener('chatlio.ready', function () {
        _chatlio.identify(<?php echo wp_json_encode( (string) $user->ID ); ?>, <?php echo wp_json_encode( $traits ); ?>);
    });
    </script>
    <?php
}, 5 );
The snippet waits for the chatlio.ready event, so it runs only after the widget has loaded. The first value is a unique ID for the visitor. The second holds the details your team sees, and you can add more fields to it, such as a plan name. See identify() for how Chatlio uses each field.
Only send details your team needs. Everything in $traits goes to Chatlio and appears in your Slack, Teams or Discord channel.
Caching and performance plugins
The plugin adds two lines of HTML to each page. A script tag in the page head loads https://js.chatlio.com/widget.js with async, and a <chatlio-widget> element before the closing body tag holds your widget ID. The script doesn’t block your page from rendering. On your server, the plugin only reads its one setting.
Page caches store those two lines like the rest of the page, which matters in two cases:
- You add or change the widget ID. Clear your page cache, and your CDN cache if you have one. Until you do, visitors get pages without the widget or with the old ID.
- You change settings in the Chatlio dashboard. You don’t need to clear anything. The widget fetches its settings from Chatlio when it loads.
If a performance plugin combines, defers or delays JavaScript, exclude js.chatlio.com/widget.js. When a plugin delays scripts until the visitor scrolls or clicks, the chat button doesn’t appear until then.
Content Security Policy
If your site sends a Content Security Policy header, from a security plugin, your host or your web server config, it has to allow Chatlio. These three lines are the smallest working set:
default-src 'self' https://*.chatlio.com wss://*.chatlio.com;
style-src 'self' 'unsafe-inline' https://*.chatlio.com;
img-src * data:;
Keep the wss:// entry. The widget gets replies over a live connection to wss://api.chatlio.com, and without it replies reach your visitors more slowly. If your policy already has script-src or connect-src lines, add Chatlio to each one. Chatlio with Content Security Policy has the full version.
Add the embed code without the plugin
You need the HTML embed code instead of the plugin when your PHP version is older than 8.3, or when you want the Sidebar or Embed inline style.
- In the Chatlio dashboard, open Widget Install, choose a widget style, and select HTML as the project type.
- Copy the embed code.
- Add it to your theme just before the closing body tag, or with a header and footer code plugin. For Embed inline, also place the placeholder
divfrom the Widget Install tab where the chat should appear.
Load the embed code only once per page. If the plugin is active, deactivate it first, or you’ll load the script twice. The setup guide explains each widget style.
Troubleshooting
The widget doesn’t appear
- In WordPress, go to Tools > Chatlio and check that Widget ID has a value. With an empty ID, the plugin adds nothing to your pages.
- Open your site, view the page source, and search for
js.chatlio.com/widget.jsand<chatlio-widget. If neither is there, clear your page cache and check that the plugin is active. Your theme must also callwp_head()andwp_footer(), as standard themes do. - If both are there, open the browser’s developer console on your site and run
_chatlio.debugVisibility(). It prints why the widget is hidden or offline. Common reasons are a page or country rule on the Behavior tab, or a widget set to hide while nobody on your team is available. - If the console shows errors that mention
chatlio.comand Content Security Policy, see Content Security Policy.
The wrong widget appears
The widget ID in Tools > Chatlio belongs to a different widget. Copy the ID again from the widget you want, save it, and clear your page cache. If the old widget still shows, search your theme and code snippets for a second Chatlio embed code and remove it.
The widget always shows offline
Your team’s availability decides this, not WordPress. In Slack, someone in the Chatlio channel has to be active. The quick start guide lists every reason Chatlio goes offline. For Teams and Discord, see Teams troubleshooting and Discord troubleshooting.
The widget covers part of my page
If the chat button covers a cart drawer, cookie banner or other element, move it with setEdgeSpacing(). You can also change its alignment or style on the Appearance tab.
I can’t find Tools > Chatlio
The settings page shows only for users who can manage site options, which normally means administrators. Log in as an administrator, and check that the plugin is active on the Plugins screen.
FAQ
Is the Chatlio WordPress plugin free?
The plugin is free to install from WordPress.org. It needs a Chatlio account to work. Every plan includes a 30-day free trial, and plans start at $30 a month. See pricing.
Do my visitors need Slack, Teams or Discord?
No. Visitors chat in the widget on your site. Only your team uses Slack, Teams or Discord.
Does it work with WooCommerce?
Yes. The widget appears on every page your theme renders, including shop, product, cart and checkout pages. If it overlaps a slide-out cart, use setEdgeSpacing() to move it while the cart is open. To hide it on checkout, see Hide it with WordPress code.
Will it slow down my site?
The plugin adds one script tag that loads with async and one HTML element, so it doesn’t block your page from rendering. The widget then loads its own code and settings from Chatlio in the background.
Can I use it on more than one WordPress site?
Yes. Every plan allows unlimited domains, so you can paste the same widget ID into each site. For a separate channel per site, create a widget for each one. Mini includes 1 widget, Team 2, Business 10 and Scale 25. On a WordPress multisite network, each site keeps its own widget ID under Tools > Chatlio.
Does it work with a free Slack workspace?
Yes. Slack’s free plan limits how much message history you can see, and that applies to Chatlio conversations in Slack too. See the pricing FAQ for details.
What happens when nobody is available?
The widget goes offline. On the Behavior tab, you choose whether it shows a contact form where visitors leave a message and their email address, or hides. Operating hours can also take it offline outside your working hours.